Punkin Paaah (Pumpkin Pie)

Pumpkin Pie
Thanksgiving came and went by in such a blur! This was my first year where I really got to tackle the whole Thanksgiving dinner meal, with help from my mom of course. First thing waking up on Thanksgiving morning, we got to work. The turkey we had ordered was 20 pounds, so prepping that was a feat in itself. I promised my family two different pies from Riley and I for dessert, but that was only because we had frozen, prepared, AND shaped dough in the freezer from a pie class we had taken. OF COURSE, 20 minutes into traffic heading to the Bay Bridge, we realize we left the dough in the freezer. So when the actual day of Thanksgiving came around, I was feeling really overwhelmed with the idea of making two sets of dough and also the filling for two pies. I wanted to make a Key Lime Pie and a Pumpkin Pie, but I realized I was too caught up with the rest of the sides to really focus on two different pies. When I saw the recipe of a pumpkin pie on the back of a 15 oz can of organic pumpkin, I calmed down a little. It wasn't too complicated, and I only needed to purchase a few ingredients.
To be honest, I really had nothing to do with the dough making. That was all Riley. He does get frustrated with dough a lot, but for some amazing reason, he always is the first to volunteer to work with it. Only if he is truly struggling does he allow me to work with it at all. But really, it turns out almost perfect every time, and this time was no exception.
We decided that the perfect time to cook the pie would be the moment we took the turkey out of the oven. It was at a good heat for pie, and the turkey needed to sit for a while and settle anyways.
I don't know about you, but I think there is something about eating pumpkin pie for breakfast in the morning the day after that's so much better than your regular eggs and toast. We used two different recipes to separate the dough and the insides, so I will post them here. This perfect pie crust was found on this website, but seems to be exactly how the Three Babes taught us in their pie making class.
In these recipes, the dough recipe yields for two dough disks, but I doubled the pumpkin filling recipe because the dough recipe yields two disks, and because pumpkin pie never has a top.
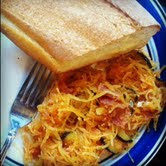
AND OKAY MY BAD, but the only finished picture I have of the pumpkin pie is the day after, and there is still plastic wrap on top. I guess it's a sign that it was so good, we plunged into the first pie before we could get a good picture. Same happened with the second. I'M OUT.
Pumpkin Pie Filling (For two pies)
Ingredients:
2 can pumpkin
2 cups firmly packed dark brown sugar
1 teaspoon salt
3 teaspoons ground cinnamon
2 teaspoons ground ginger
1 teaspoon ground nutmeg
4 eggs
2 14 ounce cans sweetened, condensed milk
Directions:
1. In a bowl, whisk together the brown sugar, salt, cinnamon, ginger, and nutmeg. Add the pumpkin, eggs, and condensed milk, and whisk to combine.
Pumpkin Pie
Ingredients:
2 1/2 cups all purpose flour, plus extra for rolling
1 cup (2 sticks or ounces) unsalted butter, very cold, cut into 1/2 inch cubes
1 teaspoon salt
1 teaspoon sugar
6 to 8 tablespoons ice water
1 tablespoon apple cider vinegar (the secret 'Three Babes' Ingredient)
Directions:
1. Preheat oven to 350 (or just pop in and start baking once your turkey comes out!). Combine flour, salt, and sugar in a large bowl. Add butter and working with your hands, break up the small squares of butter until mixture resembles coarse meal, with pea size pieces of butter. Add ice water 1 tablespoon at a time, mixing with your hands, until mixture just begins to clump together. If you pinch some of the crumbly dough and it holds together, it's ready. If the dough doesn't hold together, add a little more water and pulse again. Note that too much water will make the crust tough.
2. Remove dough from bowl and place in a mound on a clean surface. (If you want an extra flaky crust, shmoosh the dough mixture into the table top with the heel of the palm of your hand a few times. This will help flatten the butter into layers between the flour which will help the resulting crust be flaky. You can easily skip this step if you want) Gently shape the dough mixture into two disks. Work the dough just enough to form the disks; do not over-knead. You should be able to see little bits of butter in the dough. These small chunks of butter are what will allow the resulting crust to be flaky. Sprinkle a little flour around the disks. Wrap each disk in plastic wrap and refrigerate at least 1 hour, and up to 2 days.

3. Remove both crust disks from the refrigerator. Let sit at room temperature for 5-10 minutes in order to soften just enough to make rolling out a bit easier. Roll out with a rolling pin on a lightly floured surface to a 12-inch circle; about 1/8 of an inch thick. As you roll out the dough, check if the dough is sticking to the surface below. If necessary, add a few sprinkles of flour under the dough to keep the dough from sticking. Carefully place onto a 9-inch pie plate. What I do is fold my dough into quarters, which makes it easier to drape-like this


Gently press the pie dough down so that it lines the bottom and sides of the pie plate.

Use a pair of kitchen scissors to trim the dough to within 1/2 inch of the edge of the pie dish. Repeat with other dough disk. Fold the edge of the top piece of dough over and under the edge of the bottom piece of dough, pressing together. Flute edges using thumb, pointer finger, and forefinger or press with a fork.


4. Add filling to the pies (see above)


Comments
Post a Comment
Thanks for visiting!